The 10 Best Glues to Repair Your Favorite Handbag (An Easy DIY Guide)
We’ve all been there. You reach for your favorite handbag—the one that’s been with you through countless meetings, weekend adventures, and special occasions—and your heart sinks. A scuff on the corner, a loose stitch on the strap, or the dreaded broken zip. It feels a little like seeing an old friend get hurt.
Before you relegate that trusty companion to the back of the closet, take a moment. The data doesn’t lie: searches for “handbag repair,” “luxury purse repair,” and “designer bag restoration” are skyrocketing. Why? Because we’re realizing that our bags aren’t just accessories; they’re investments and repositories of memories. As one of the top “People Also Ask” questions ponders, “Is it worth restoring an old handbag?” For anyone who has a bag they love, the answer is a resounding yes.
The Sentiment and The Craft: Why Repair Beats Replace
Often, it’s not just about cost, though restoring a high-quality bag is almost always cheaper than replacing a luxury one. It’s about sentiment. That Coach bag you bought with your first bonus, the Louis Vuitton Speedy your grandmother passed down, the leather satchel you found on your travels—these items have stories. Repairing them honors those stories.
Furthermore, quality bags from renowned brands are built to last. Think of the iconic designs we all know and love:
- Hermès Birkin & Kelly: The pinnacle of craftsmanship, hand-stitched and meant for generations.
- Louis Vuitton: Known for their durable canvas and treated leather trims.
- Gucci: A symbol of Italian luxury, often featuring robust GG Supreme canvas.
- Coach: Famous for their glove-tanned leather that develops a beautiful patina over time.
- Chloé, Prada, Fendi: Each boasts distinctive hardware and construction techniques.
These brands use materials and methods that make them perfect candidates for restoration. And while brands like Gucci and Louis Vuitton do offer repair services, they can be costly and have long wait times. This is where specialists like Leather Surgeons come in, a company so trusted they command a huge search volume (50%!) despite a smaller keyword volume, indicating a highly targeted and confident audience.
But what about the smaller, everyday wear and tear? Not every issue requires a master craftsman. For the DIY-inclined, a little courage and the right adhesive can work wonders.
The DIY Savior: Best Guide to 10 Amazing Adhesives for Handbag Repair
Before we dive in, a word of caution: Always test any adhesive on a small, inconspicuous area first. Patience and precision are your best friends. Good ventilation is a must!
Here are 10 fantastic adhesives available on Amazon, perfect for your at-home handbag rescue missions.
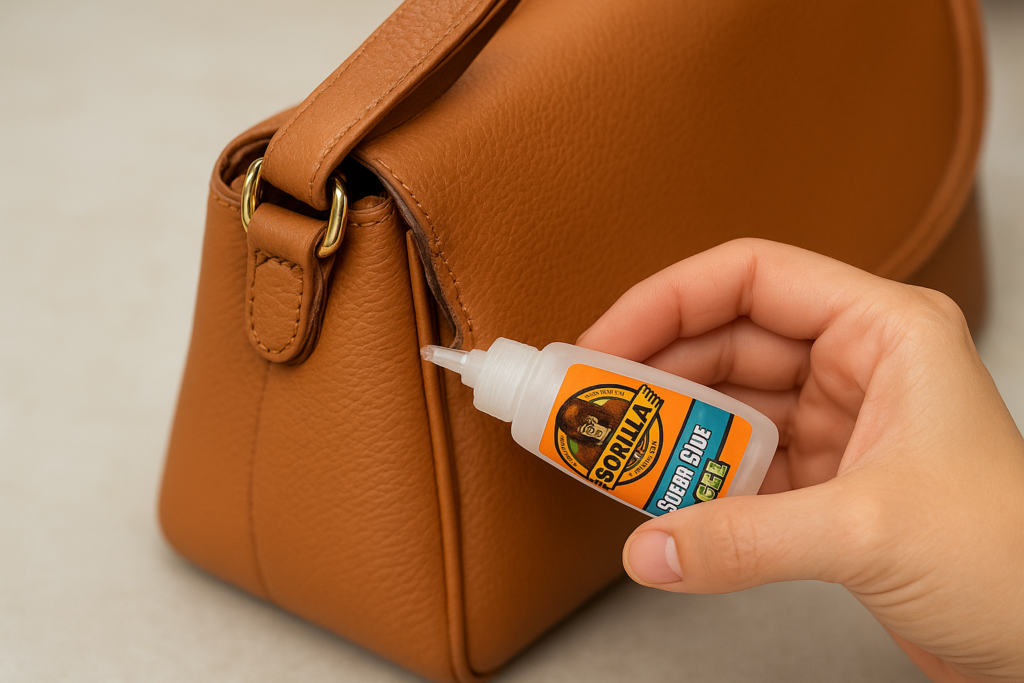
1. Gorilla Super Glue Gel
Best For: Small, precise fixes like reattaching loose hardware (chains, clasps), sealing tiny cuts, or fixing a peeling interior label.
Why It Works: The gel formula is its superpower—it doesn’t run, so you have excellent control. It bonds quickly to leather, metal, and plastic.
DIY Step-by-Step:
- Clean the surfaces with a cotton swab dipped in rubbing alcohol. Let it dry completely.
- Apply a tiny drop of the gel to one surface.
- Press the pieces together firmly and hold for 30-60 seconds.
- Let it cure for at least 2 hours before handling, and 24 hours for full strength.
2. Barge All-Purpose Cement
Best For: Major leather-to-leather bonds, such as reattaching a peeling leather flap or fixing a delaminated strap.
Why It Works: This is a professional-grade contact cement used by cobblers. It creates a flexible, waterproof, and incredibly strong bond.
DIY Step-by-Step:
- Ensure both surfaces are clean and dry. Roughen smooth leather slightly with fine-grit sandpaper for better adhesion.
- Apply a thin, even layer to both surfaces. Wait 10-15 minutes until the glue is tacky to the touch.
- Carefully align the pieces and press together firmly. Use a roller or the back of a spoon to apply strong, even pressure.
- Let it cure for 24-48 hours for a permanent bond.
3. E6000 Craft Adhesive
Best For: A versatile heavy-lifter: attaching embellishments, repairing straps, bonding fabric linings, or fixing soles on leather-bottom bags.
Why It Works: E6000 is a industrial-strength adhesive that dries clear and remains flexible. It’s waterproof and washable once cured.
DIY Step-by-Step:
- Clean the surfaces thoroughly.
- Apply a bead of E6000 to one surface. It can be a bit smelly, so work in a well-ventilated area.
- Press the pieces together. You have a few minutes to adjust positioning.
- Use masking tape or clamps to hold the bond in place. Let it cure for 24-72 hours for maximum strength.
4. Aleene’s Leather & Suede Glue
Best For: A craft-friendly option for suede patches, fixing felt linings, or repairing lightweight leather trims.
Why It Works: This glue is specifically formulated for porous materials like leather and suede. It remains flexible and is non-toxic.
DIY Step-by-Step:
- Clean the area and let it dry.
- Apply glue to one surface and press the pieces together.
- Wipe away any excess with a damp cloth immediately.
- Let it set for a few minutes, then allow it to dry fully for 2-4 hours.
5. Shoe Goo
Best For: The name says it all! Perfect for repairing worn corners, sealing seams on canvas bags, or filling in small gouges on the bottom of a bag.
Why It Works: It’s a thick, gooey adhesive that dries into a tough, rubber-like sealant, making it ideal for high-wear areas.
DIY Step-by-Step:
- Clean and dry the repair area.
- Apply Shoe Goo directly into the crack or over the worn area. For seams, apply a bead along the split.
- Smooth it with a popsicle stick or your finger (dipping your finger in water prevents sticking).
- Let it cure for 24-48 hours. It will remain slightly flexible, which is perfect for movement.
6. Loctite Ultra Gel Control Super Glue
Best For: Another excellent super glue option, great for precision work like fixing the hinge on a clasp or re-gluing a stubborn zipper pull.
Why It Works: The patented side-squeeze design gives you unparalleled control, preventing messy oozes.
DIY Step-by-Step:
- Clean the area with alcohol.
- Use the precise applicator to place a minute drop exactly where you need it.
- Hold the pieces together firmly for 30 seconds.
- Allow it to set for at least 2 hours.
7. Tear Mender Fabric & Leather Adhesive
Best For: Repairing torn fabric linings, patching the inside of a pocket, or fixing a canvas tote. It’s also great for leather.
Why It Works: This is a super-strong, flexible adhesive that dries quickly and can often withstand washing.
DIY Step-by-Step:
- Apply a thin layer to one or both surfaces.
- Press together immediately—it sets in seconds!
- For a fabric patch, apply adhesive around the tear, place the patch, and press firmly.
- It reaches handling strength in 5 minutes.
8. Gorilla Epoxy
Best For: The toughest jobs, like repairing a broken plastic frame, a cracked handle base, or fixing a metal foot on the bottom of a bag.
Why It Works: Epoxy is a two-part system (resin and hardener) that creates a permanent, rock-hard bond that can be sanded and painted.
DIY Step-by-Step:
- Dispense equal amounts of the resin and hardener onto a disposable surface.
- Mix thoroughly for one minute until it’s a uniform color.
- Apply the mixture to the repair area. You have about 5 minutes of working time.
- Hold the pieces together or use clamps. It will set in 5-10 minutes and fully cure in 24 hours.
9. 3M Super 77 Multipurpose Spray Adhesive
Best For: Covering large areas, like re-adhering a completely detached fabric lining or applying a new leather patch.
Why It Works: This spray creates a fast-tack, permanent bond over a wide surface, which is impossible with a tube of glue.
DIY Step-by-Step:
- PROTECT YOUR WORK AREA with newspaper. Mask off any areas you don’t want glued.
- Shake the can well. Hold it 6-8 inches away and spray a light, even coat on one surface.
- Wait a minute for it to become tacky.
- Carefully align and press the surfaces together, smoothing out from the center to avoid air bubbles. Let dry.
10. Lexel Clear Adhesive Sealant
Best For: A flexible, clear, and waterproof seal for seams on weatherproof bags or for creating a protective layer over a repaired area.
Why It Works: Lexel is ten times more flexible than silicone, remains clear, and adheres to almost anything.
DIY Step-by-Step:
- Clean and dry the area.
- Load a caulking gun and apply a smooth, continuous bead.
- Smooth the bead with a wet finger or a tool for a clean finish.
- Skin forms in 15 minutes; full cure takes 24-72 hours.
Knowing Your Limits: When to Call a Pro
While these DIY fixes are empowering, the data shows that people are actively searching for experts, especially in fashion hubs like NYC, London, and Dublin. If your bag has significant structural damage, requires re-dyeing, has a broken frame, or is a high-value luxury item, it’s time to call a professional. The search volume for “Leather Surgeons” and location-specific terms like “handbag repair nyc” proves that trusting a specialist for complex jobs is the wisest choice. They have the tools, expertise, and materials to make your bag look truly new again.
So, go on, give that beloved handbag a second look. With a little care, the right glue, and the confidence to try, you can extend its life for many more adventures to come. After all, the best bags aren’t just the ones we buy; they’re the ones we keep.