Beyond the Hype: A Deep Dive into the LifeisLuck 50g Shoe Glue- Professional Flexible Repair Shoe Glue (Is It Really That Good?)
Let’s be honest: we all have that one pair. The perfectly broken-in hiking boots with a sole that’s starting to peel, the favorite sneakers that have seen one too many miles, or the leather handbag with a strap that’s threatening to give up the ghost.
We face a crossroads: do we toss them and spend a small fortune on a replacement, or do we attempt a repair with a product that promises the world but often delivers a sticky, disappointing mess?
I’ve been there countless times.
After one too many glue-tube failures, I decided to put a highly-rated option to the test: the LifeisLuck 50g Shoe Glue with nozzles – Professional Flexible Repair Shoe Glue.
I didn’t just use it once; I put it through a gauntlet of real-world repairs over several weeks. This isn’t just a quick “it worked” review. This is a comprehensive look at what this adhesive is, what it’s truly capable of, and how to use it to get professional-looking results.
First Impressions: More Than Just a Tube
The product arrives in a modest package, but the real value becomes apparent as soon as you open it. You get one large 50g tube of clear glue and a set of 10 micro-tipped applicator nozzles.
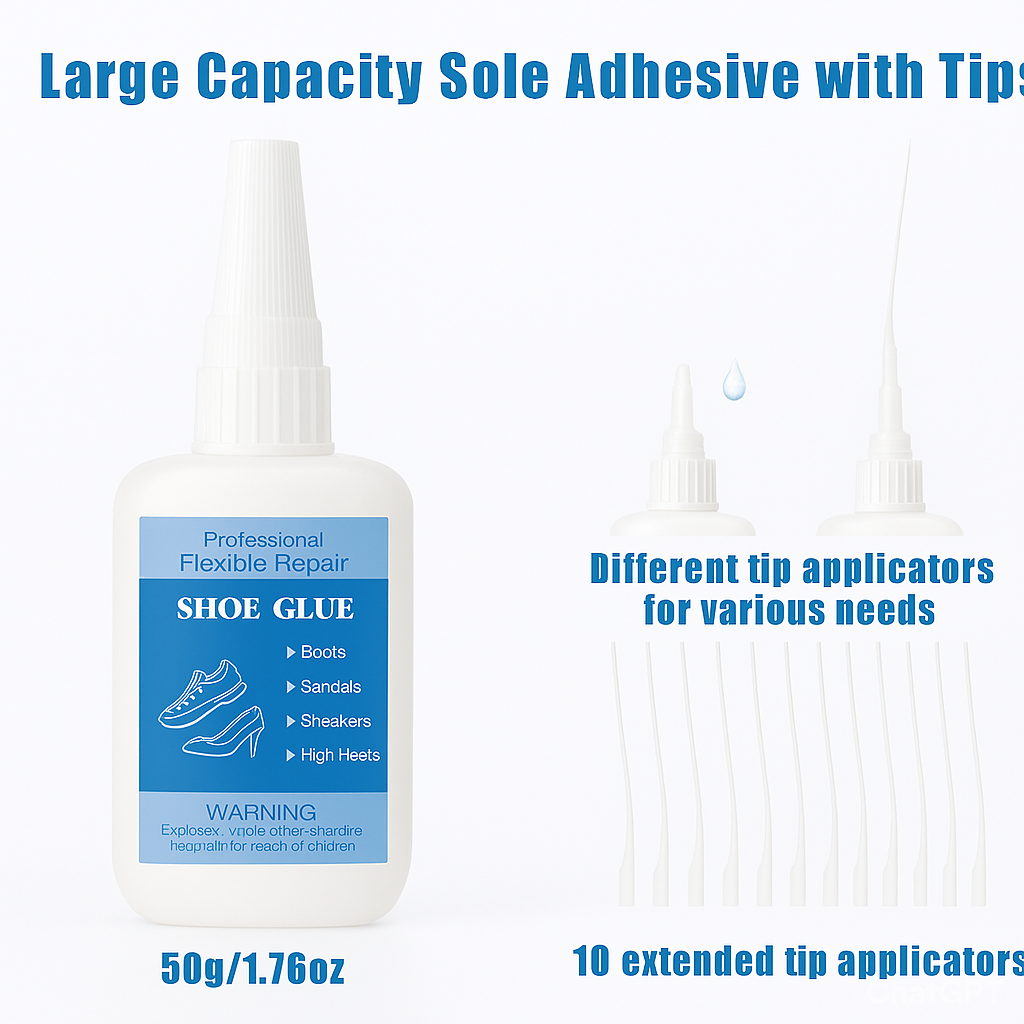
This immediately sets it apart from the single, tiny tubes of super glue you find at the checkout aisle. The 50g capacity means you have enough adhesive for multiple projects, and the variety of nozzles is a game-changer for precision work.
The glue itself is described as a quick-dry, waterproof, strong adhesive that dries clear. The claims of being non-toxic and washable are also reassuring for those of us who are, let’s say, “craft-challenged” and prone to minor mishaps. But as we know, the packaging can make many promises. The true test is in the application.
What Is This Glue, Really? Understanding Its Nature
Before we get to the repairs, a crucial point needs to be addressed. Scanning through dozens of reviews from the United States and Canada, a common thread emerges. Customers who purchased the “Wood Glue” or “Leather Glue” variants of this product consistently noted one thing: This is not a traditional PVA wood glue or a flexible leather cement. Its behavior is fundamentally that of a high-strength cyanoacrylate—what we commonly call “super glue”—just in a much larger, more practical bottle.
As one Canadian reviewer, Nana, astutely pointed out, “This glue is not like typical wood glue. More like crazy glue… User must wear gloves to protect hands. If the glue drips it behaves like crazy glue.”
Another user, Thomas, confirmed this with his three-star review for the wood version, succinctly titled, “Super glue. Not wood glue.”
This is not necessarily a bad thing, but it’s critical to managing your expectations. A cyanoacrylate adhesive creates a hard, rigid, and incredibly strong bond. It works by polymerizing in the presence of moisture, which is why it sticks to your skin so quickly. This makes it fantastic for certain applications but less ideal for others that require a flexible bond.
Keyword Takeaway: Think of this as a bulk super glue with precision nozzles, not a specialized, flexible rubber cement. This understanding is the key to using it successfully.
Putting It to the Test: Real-World Case Studies
I used the LifeisLuck glue on three distinct projects, each representing a common repair scenario.
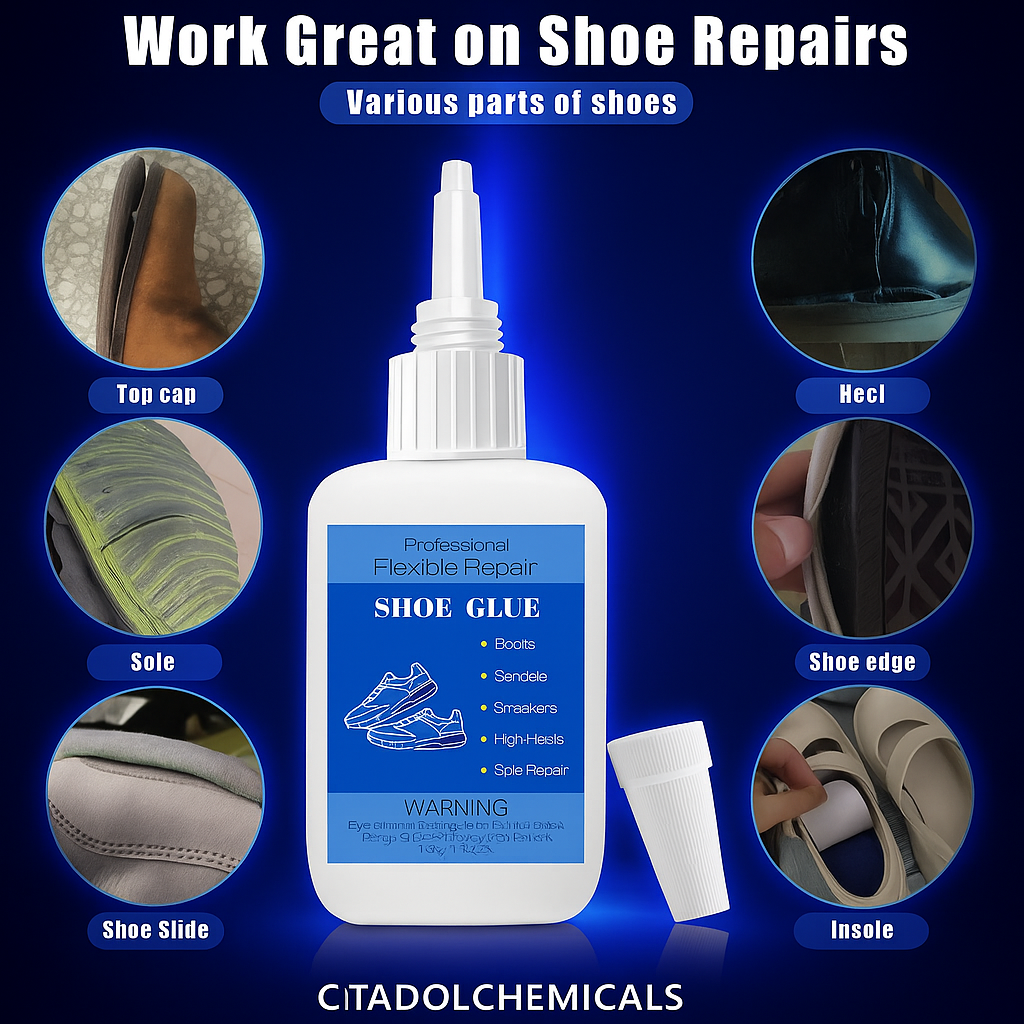
Case Study 1: The Separated Sneaker Sole
This is the classic shoe repair. The rubber outsole on my everyday running sneakers had begun to separate from the midsole along the toe. This is a prime candidate for this glue.
My Step-by-Step Process:
- Preparation is 90% of the Success: I first cleaned the separation channel thoroughly. I used a cotton swab dipped in rubbing alcohol to remove any dust, dirt, and old adhesive residue. This is a non-negotiable step; any contamination will weaken the bond.
- Applying the Glue: I selected one of the finer micro-tipped nozzles from the set. This allowed me to slide the tip deep into the narrow gap between the sole and the upper. I applied a thin, consistent bead of glue along the entire length of the separation. The quick-dry feature meant I had to work efficiently and not apply too much at once.
- Clamping and Curing: I immediately pressed the sole firmly back into place, wiping away a tiny bit of excess that squeezed out with a clean, dry cloth (be careful, as it can stick to the cloth!). To ensure a tight bond, I used a combination of heavy books and a few strategically placed binder clips to apply even pressure for about two hours. While it was quick-drying, a full strength adhesive bond develops over 24 hours.
- The Result: After 24 hours, the bond was rock solid. The clear finish was invisible, and the shoes were ready for action. The repair has held up perfectly for over a month of regular use. The waterproof claim seems valid, as I’ve since walked through a few puddles with no issues.
Case Study 2: A Leather Handbag Strap Ring
A metal ring on my wife’s leather handbag, used for attaching the strap, had become loose and was spinning freely. The connection point was tiny and required precision.
The Process:
- The goal here was capillary action—getting the glue to wick into a microscopic space. The ultra-fine applicator nozzle was perfect for this.
- I carefully placed the tip at the edge of the ring where it met the leather and applied a minuscule drop. The thin consistency of the glue, noted by reviewer Shawn Bolan, worked to my advantage here. It was drawn into the gap immediately.
- I held the ring in place for about 40 seconds (the glue’s stated setting time), and it was secure. The strong adhesive property meant that this tiny amount was all that was needed for a permanent fix.
Case Study 3: A Creative Fix (Inspired by the Reviews)
Inspired by the ingenuity of reviewers like Shawn Bolan and RLJR, I decided to try a non-shoe repair. I had a small, hard-plastic knob on a kitchen cabinet that had cracked.
- I applied a small amount of glue to the cracked surface, again using a fine nozzle for control.
- I pressed the pieces together, held them for a minute, and let it cure. The bond was instant and incredibly durable. This echoes the success of users who repaired bike tires and Velotoze shoe covers, demonstrating the glue’s versatility on materials like rubber, silicone, and hard plastics.
The Good, The Bad, and The Sticky: A Balanced Verdict
The Pros (Where It Shines):
- Exceptional Strength: When used on appropriate materials, the bond is remarkably strong and durable.
- Precision Application: The 10 included nozzles are a massive advantage, transforming a bulky tube into a precision instrument.
- Excellent Value: The 50g size offers far more value per ounce than countless small tubes.
- Truly Quick-Drying: The fast setting time is great for quick fixes, though it demands preparedness.
- Dries Clear and Waterproof: The invisible finish and water resistance are perfect for shoe repair and outdoor gear.
The Cons (What to Watch For):
- The “Super Glue” Reality: Its thin, fast-drying, rigid-bonding nature can be a drawback for materials that need flexibility. For a flexible sole that bends constantly, a specialized flexible rubber cement might be superior in the long run, though my sneaker repair has held firm.
- Potential for Mess: As Shawn Bolan experienced, the thin viscosity can lead to messes if you’re not careful. It can run where you don’t want it and bond skin in seconds. Always wear gloves.
- Not for Porous Materials: It is not ideal for gluing large, flat, porous surfaces like wood panels where a PVA glue would be better. It excels at bond-line repairs (cracks, edges, punctures).
Your Step-by-Step Guide to a Perfect Repair
To ensure your success, follow this simple guide:
- Safety First: Put on disposable nitrile or latex gloves. Protect your work surface with cardboard or wax paper.
- Clean Meticulously: All surfaces must be clean, dry, and free of oil. Use isopropyl alcohol and a cotton swab for best results.
- Select the Right Nozzle: Choose the finest nozzle that allows you to apply glue precisely where needed.
- Apply a Thin Layer: Less is more. Apply a thin, even bead. You can always add a little more if needed, but you can’t take it away.
- Clamp and Secure: Immediately join the parts and apply firm, even pressure for at least 1-2 minutes. Use rubber bands, clamps, or heavy objects to hold the bond for 1-2 hours for maximum strength.
- Clean Up Excess: Quickly wipe away any squeezed-out glue with a dry cloth. If you get it on your skin, use acetone-based nail polish remover carefully.
- Be Patient: Allow a full 24 hours for the bond to reach its maximum strength before subjecting the item to stress.
Final Verdict: Who Is This For?
The LifeisLuck 50g Shoe Glue (Professional Flexible Repair Shoe Glue ) is an excellent product, but it’s not a magical universal adhesive. It is a powerhouse bulk super glue with unparalleled precision for its category.
Buy this glue if:
- You need to repair shoes, boots, and sandals, particularly for sole separations and small cracks.
- You work on crafts or small repairs that require a strong, clear, fast-setting bond on non-porous materials like rubber, plastic, metal, or leather.
- You’re tired of wasting money on tiny, single-use tubes of super glue.
You can visit Amazon and you will be sorted out.
Look for a different solution if:
- You need a flexible bond for materials that constantly bend and flex.
- You are gluing large, porous wood surfaces.
- You are not prepared to work carefully and precisely with a fast-setting adhesive.
In conclusion, the LifeisLuck Shoe Glue has earned a permanent spot in my repair toolkit. Its combination of strength, volume, and precision makes it a standout product. By understanding its true nature as a cyanoacrylate and following a careful process, you can save countless items from the landfill and achieve repairs that are not only functional but virtually invisible. It’s a simple product, but when used with knowledge, it becomes an incredibly powerful one.