
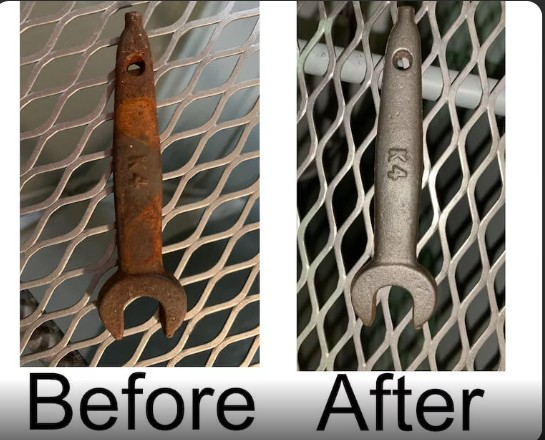
Let me tell you something embarrassing.
A few years back, I had this gorgeous cast iron skillet that my grandmother left me. It sat in a corner of my kitchen like a museum piece because I was too scared to cook with it. Why? Rust. A thick, angry orange coat of rust that made it look like it had survived a shipwreck.
I Googled. I watched YouTube videos. I tried vinegar. I tried scrubbing. I tried praying to the cast iron gods.
Nothing worked. At least, nothing worked right—because I was doing everything out of order, using the wrong stuff, and honestly, I had no idea what I was actually dealing with.
Eventually, I figured it out. The skillet now lives on my stove, gets used every other day, and is basically a family heirloom. And along the way, I got way too interested in the science and art of how to remove rust from metal—like, embarrassingly obsessed.
This article is everything I wish someone had told me back then. Not the sanitized, “just use baking soda!” version. The real version. The one that works on bike frames, garden tools, car parts, old fencing, kitchen equipment, and yes, your precious cast iron.
Let’s get into it.
First, Let’s Talk About What Rust Actually Is (Bear With Me, It’s Important)
Before you grab a scrubbing pad and go to war, you need to understand your enemy.
Rust isn’t just “dirty metal.” It’s a chemical reaction. When iron or steel is exposed to oxygen and moisture over time, it oxidizes—meaning it reacts with water and air to form iron oxide, which is the crumbly, flaky, reddish-brown stuff we call rust.
And here’s the thing: rust doesn’t just sit on the surface like paint. It eats into the metal. Left long enough, it can make a strong piece of steel structurally unsound. It’s not cosmetic. It’s destructive.
But here’s the good news: unless the metal has rusted all the way through, you can absolutely save it.
The process of how to get rust off metal comes down to a few approaches:
- Mechanical removal (scraping, sanding, grinding)
- Chemical removal (acids, rust converters, commercial rust removers)
- Electrolysis (yes, science is cool)
- Natural/home remedies (vinegar, baking soda, potato—seriously)
Each one has a time and place. By the end of this guide, you’ll know exactly which one to use for your specific situation. Let’s go.
Step 1: Assess the Situation (Don’t Skip This)
Look, I know you’re ready to start scrubbing. But the single biggest mistake people make when they try to remove rust from metal is jumping straight to the “doing” without spending two minutes on the “thinking.”
Ask yourself:
How bad is the rust?
- Surface rust (just a reddish tint, still smooth-ish)? Easy. You’ve got options.
- Moderate rust (flaking, rough to the touch, some pitting)? Doable, but you’ll need more effort.
- Heavy rust (deep pitting, chunks falling off, structural damage)? You’ll need the big guns.
What kind of metal is it? Cast iron, steel, stainless steel, and galvanized metal all respond differently to rust treatments. Some are tougher than others. Some can handle harsh chemicals; others can’t.
What is the item used for? A decorative garden stake rusting is different from a kitchen knife rusting. Food-contact items need rust removal methods that are food-safe. Car parts need methods that can handle heavy-duty work.
Can you disassemble it? Removing parts from a machine, bike, or appliance before treating rust is almost always easier than treating the whole thing in situ.
Got your answers? Good. Now let’s pick your weapon.
Method 1: The Mechanical Approach — Good Old-Fashioned Muscle
This is the most straightforward method and the one your grandfather probably used. You’re physically removing the rust by abrading it off.
What You’ll Need:
- Wire brush (manual or drill attachment)
- Sandpaper (start with 80-grit, finish with 220-grit)
- Steel wool (grade 0000 for fine finishing)
- Safety goggles and gloves (non-negotiable—rust particles are not something you want in your eyes)
- A flat workspace
How to Do It:
Step 1: Start with the wire brush. Scrub vigorously in multiple directions to break up and remove loose rust. Don’t be gentle here—you’re not petting a cat. You’re fighting corrosion.
Step 2: Switch to coarse sandpaper (80-grit) and sand the rusted area in circular motions. You’re going deeper now, past the surface rust.
Step 3: As the rust decreases, move to finer sandpaper (150-grit, then 220-grit). This smooths out the scratches and leaves you with a cleaner surface.
Step 4: Wipe everything down with a clean, dry cloth to remove dust and debris.
Step 5: Immediately apply a protective coating (more on this later) to prevent new rust from forming. And yes, “immediately” is doing a lot of work in that sentence. Don’t walk away for three hours and come back. Bare metal starts oxidizing almost immediately in humid conditions.
Best For:
- Small to medium rust patches
- Tools, garden implements, bike frames
- When you don’t want to use chemicals
Honest Limitations:
Mechanical removal is effective but physically exhausting on large surfaces. It also doesn’t get into crevices, threads, or tight corners well. For those areas, you’ll need one of the methods below.
Method 2: White Vinegar — The Pantry Hero You Didn’t Know You Had
Okay, let me tell you something wild: one of the best metal rust removers hiding in your kitchen costs about a dollar a bottle.
White vinegar contains acetic acid, which reacts with rust (iron oxide) and dissolves it. It’s slow-acting compared to commercial products, but it’s cheap, safe, and surprisingly effective for moderate rust.
What You’ll Need:
- White vinegar (the cheap stuff is fine)
- A container big enough to submerge your item
- Steel wool or a scrub brush
- Baking soda (to neutralize afterward)
- Water for rinsing
How to Do It:
Step 1: Submerge the rusty item in white vinegar. Yes, just pour it in a bowl or bucket and drop the thing in. If it’s too big to submerge, soak rags in vinegar and wrap them around the rusted areas.
Step 2: Let it sit. For light rust, 30 minutes to an hour is enough. For moderate rust, leave it overnight. For serious rust, you might need 24 hours or more. Yes, patience is required.
Step 3: Remove the item and scrub with steel wool or a brush. The rust should come off much more easily now—the acid has broken down the bonds holding it to the metal.
Step 4: This is the step people skip and then wonder why their metal rusts again immediately: rinse thoroughly with water, then mix baking soda with water into a paste and rub it over the metal. This neutralizes any remaining acid. Rinse again.
Step 5: Dry completely. Then protect (more below).
Best For:
- Kitchen items (knives, cast iron)
- Small hand tools
- Nuts, bolts, screws (soak a whole bag at once)
- Budget-conscious rust removal
Important Notes:
Don’t leave items in vinegar for too long—extended soaking can start to damage the metal itself. Also, vinegar doesn’t work well on stainless steel or aluminum; those need different approaches.
Method 3: Baking Soda Paste — The Gentle Giant
Baking soda is mildly alkaline, and when mixed with water into a paste, it can help lift light rust through a combination of gentle abrasion and chemical action.
This isn’t your method for serious rust. But for surface rust on items you care about—kitchen knives, bicycle parts, decorative metalwork—it’s surprisingly effective and very gentle.
How to Do It:
Step 1: Mix baking soda and water into a thick paste (about 3:1 ratio, baking soda to water).
Step 2: Apply the paste generously to the rusted area and let it sit for about an hour.
Step 3: Scrub with a wire brush, toothbrush (for tight spaces), or steel wool.
Step 4: Rinse thoroughly with water and dry immediately.
This method pairs really nicely with vinegar—use vinegar for the deep work, then finish with baking soda to neutralize and do a final gentle scrub.
Method 4: Commercial Rust Removers — When You Mean Business
Sometimes the natural stuff just won’t cut it. You’ve got a seriously rusted piece of steel, a car part that looks like it crawled out of the ocean, or you simply don’t have three days to soak something in vinegar. That’s when you reach for a dedicated rust remover for metal.
Commercial rust removers generally work in one of two ways:
Acidic rust removers (like phosphoric acid-based products) dissolve rust chemically by reacting with iron oxide and converting it to a more stable compound. They’re fast, effective, and come in gel or liquid form.
Rust converters don’t remove rust—they chemically convert it into a stable black primer-like coating that you can paint over. These are great for things like car chassis, metal furniture, and fencing where you can’t sand everything down but need to stop the rust from spreading.
Popular Options Worth Knowing:
- Evapo-Rust: Water-based, non-toxic, very effective for soaking. One of the best on the market for removing rust from metal without damaging the base metal.
- WD-40 Specialist Rust Remover Soak: Dissolves rust in 30 minutes without scrubbing on many items.
- Rust-Oleum Rust Dissolver: Gel formula, great for vertical surfaces or items you can’t soak.
- Ospho (Phosphoric Acid): Old-school, serious, used widely in automotive and industrial settings.
How to Use a Rust Remover (General Process):
Step 1: Read the label. I know, boring. But different products have wildly different instructions, and misusing them can damage your metal or be a safety hazard.
Step 2: Prepare the item—remove loose rust with a wire brush if possible.
Step 3: Apply the product (soak, spray, or gel, depending on the product).
Step 4: Wait for the recommended time (usually 15 minutes to a few hours).
Step 5: Rinse or wipe off according to instructions.
Step 6: Dry thoroughly and apply protective finish.
Best For:
- Heavy rust on large items
- Car parts, tools, machinery
- When time is limited
- Industrial or professional applications
Method 5: Electrolysis — The Nerdy One That Actually Slaps
Okay, I’m going to nerd out for a second, and I promise it’s worth it.
Electrolysis is a method where you use a mild electric current to pull the rust off the metal. It sounds complicated, but the setup is surprisingly simple, and it’s absolutely extraordinary for removing rust from intricate items—like old tools, antique hardware, or anything with detailed carvings or threads where mechanical scrubbing would be impossible.
What You’ll Need:
- A plastic container (big enough for your item)
- Water
- Washing soda (sodium carbonate—NOT baking soda)
- A battery charger (a simple 12V car battery charger works)
- A piece of scrap steel or iron (this will be your sacrificial anode)
- Cables and clips
Very Basic Setup:
- Fill the container with water and dissolve 1 tablespoon of washing soda per gallon.
- Connect the positive (+) terminal of the charger to the scrap steel (the anode).
- Connect the negative (-) terminal to the rusty item (the cathode).
- Submerge both in the water, making sure they don’t touch each other.
- Turn on the charger and let it run.
Over time (usually a few hours to overnight), the rust migrates from your item to the scrap steel. What you end up with is a mostly rust-free piece of metal covered in a black coating that wipes right off.
Yes, this is real. Yes, it works incredibly well. And no, you don’t need an engineering degree. But you do need to do it outdoors or in a well-ventilated area—the process produces hydrogen gas, which is flammable.
Best For:
- Antique tools and hardware
- Intricate or ornamental metalwork
- Cast iron (especially skillets and Dutch ovens)
- When you want to preserve detail and avoid abrasion
Method 6: The Potato Trick — Because Why Not?
This one sounds like something your quirky aunt would suggest, but hear me out.
Potatoes contain oxalic acid, which—like vinegar—reacts with iron oxide and helps break it down. This isn’t a heavy-duty rust removal method, but for surface rust on small items, it actually works.
How to Do It:
Step 1: Cut a potato in half.
Step 2: Dip the cut side in dish soap or baking soda (both add a little extra cleaning power).
Step 3: Rub the potato over the rusted surface.
Step 4: Let it sit for a couple of hours.
Step 5: Rinse and dry.
That’s it. For very light rust or as a first-pass attempt before using something stronger, this is totally legitimate. And it makes for a great story.
Specific Scenarios: What to Use and When
Removing Rust From Cast Iron Pans
Use the electrolysis method or a vinegar soak (no more than 30 minutes for cast iron—the acid can damage it if left too long). Finish by drying completely in the oven on low heat, then re-seasoning with a thin coat of vegetable oil.
Removing Rust From Knives
Vinegar soak works beautifully. For serious rust, use a commercial rust remover made for food-safe surfaces. After treatment, sharpen the blade and apply a light coat of food-grade mineral oil.
Removing Rust From Bike Frames and Parts
Disassemble as much as possible. Use a rust remover for steel on the frame (Evapo-Rust or a phosphoric acid product), and soak small parts like bolts and screws. Sand smooth, then prime and paint.
Removing Rust From Garden Tools
Wire brush to remove loose rust, then vinegar soak overnight. Rinse, dry, sand smooth, and rub with linseed oil to protect and restore wooden handles.
Removing Rust From Car Parts
This is where you go commercial. Phosphoric acid products like Ospho, or a rust converter if you’re going to paint over it. For structural parts, get a professional assessment—rust on car frames can be a safety issue.
Removing Rust From Outdoor Furniture and Fencing
Wire brush the loose stuff, then apply a rust converter. Paint over with a rust-inhibiting primer and exterior paint. For long-term protection, this is your best bet because you can’t always sand or soak large structures.
Protecting Metal After Rust Removal: The Step Most People Skip
Here’s the thing about rust: once you remove it, the bare metal underneath is more vulnerable than it was before, because you’ve exposed fresh, reactive metal surface.
If you don’t protect it immediately, it will rust again. Sometimes within hours in humid conditions.
Here’s how to protect your metal after treatment:
Option 1: Oil
For tools, cast iron, and food-contact items, a thin coat of oil is your best friend. Mineral oil, WD-40, linseed oil, or food-grade mineral oil all work. Apply a thin, even coat and wipe off the excess.
Option 2: Primer and Paint
For outdoor items, vehicles, and furniture, apply a rust-inhibiting primer first, then paint over it. Rust-Oleum makes excellent primer products for this purpose.
Option 3: Clear Coat
For decorative metalwork where you want to show the metal finish, apply a clear lacquer or sealant after rust removal. It protects against moisture without changing the appearance.
Option 4: Wax
Paste wax (like car wax) can be applied to tools and surfaces to repel moisture and prevent rust. It needs to be reapplied periodically, but it’s easy and effective.
Option 5: Powder Coating
For items that take real abuse—bike frames, tool heads, industrial equipment—powder coating is the gold standard of rust prevention. It’s a process done professionally that creates a tough, durable finish that’s far more resistant to moisture than paint.
Common Mistakes to Avoid
Let’s save you some frustration.
Mistake 1: Using the wrong method for the severity of rust. Baking soda won’t fix a severely rusted car part. Grinding won’t get into threaded holes. Match your method to your problem.
Mistake 2: Not drying the metal completely after treatment. Water left on bare metal = rust returning within hours. Use a cloth to dry, then put it in a warm oven for a few minutes if you can, especially for cast iron.
Mistake 3: Skipping protection after rust removal. You’ve done all that work. Don’t waste it. Apply oil, paint, or sealant immediately after.
Mistake 4: Using steel wool on stainless steel. This can leave behind tiny steel particles that will themselves rust on the stainless surface. Use a stainless steel brush or plastic abrasive pads instead.
Mistake 5: Breathing in rust dust. Wear a dust mask or respirator when sanding or grinding rust. Inhaling iron particles is not good for your lungs. Also wear safety goggles—those particles move fast.
Mistake 6: Using harsh chemicals without reading the label. Phosphoric acid can hurt you. Commercial rust removers for steel often contain serious chemicals. Gloves, eye protection, ventilation. Always.
When to Give Up and Call a Professional (Or Replace the Item)
Sometimes, rust has won.
If a piece of metal has rusted through—meaning you can see holes, the metal crumbles when you touch it, or structural integrity is compromised—it may be beyond saving. This is especially true for:
- Vehicle frames and structural components (safety risk)
- Pressure vessels, pipes, or tanks
- Load-bearing brackets or fasteners
- Anything where failure could cause injury
In these cases, get a professional assessment. For smaller items like rusted-through tools or hardware, it’s often cheaper and safer to simply replace them.
And hey, there’s no shame in it. You gave it a shot.
Quick Reference: Rust Removal Cheat Sheet
| Situation | Best Method |
|---|---|
| Light surface rust, small item | Vinegar soak + scrub |
| Light rust on cast iron | Short vinegar soak + electrolysis |
| Moderate rust on tools | Commercial rust remover (Evapo-Rust) |
| Heavy rust on steel parts | Phosphoric acid or rust converter |
| Intricate details, antique hardware | Electrolysis |
| Can’t soak or scrub (large structure) | Rust converter + paint |
| Food-safe items | Vinegar, baking soda, food-safe rust remover |
| Fast results needed | Commercial rust remover soak |
The Bottom Line: You Can Do This
ust feels intimidating. I get it. It looks like something has gone fundamentally wrong, like the metal is dying right in front of you.
But rust is just chemistry. And chemistry can be undone.
Whether you’re rescuing a beloved cast iron skillet, restoring a rusty bicycle, or fighting back a decade of neglect on a set of garden tools, the process is the same: understand what you’re working with, pick the right method, do the work, and protect what you’ve reclaimed.
You don’t need expensive equipment. You don’t need professional skills. You need a little patience, the right products, and the willingness to get your hands dirty.
Your metal isn’t gone. It’s just waiting to be saved.
Take Action Right Now
Don’t let this article just sit in a browser tab while that rusty tool in your garage keeps on rusting.
Here’s your 5-minute action plan:
- Go find the rustiest thing in your home. Check the kitchen, garage, garden shed, or basement.
- Assess the rust level using the scale we talked about (surface, moderate, or heavy).
- Pick your method from this guide.
- Gather your supplies. Chances are you’ve got vinegar and baking soda at home right now.
- Start tonight. Even soaking something in vinegar before bed means you wake up to a rust removal job that’s halfway done.
If you found this guide helpful, share it with a friend who’s got a rusty bike, a sad-looking skillet, or a set of garden tools crying out for love. And if you’ve got a rust horror story or a success story, share it in the comments—I genuinely love hearing how these things turn out.
Now go rescue something.
Got questions about a specific rust situation? Drop it in the comments and let’s figure it out together. No rusty metal left behind.