Ever looked at acrylic sheets and thought:
“Looks simple enough. I’ll just buy some glue, stick everything together, and build my cabinet.”
Then five hours later you’re staring at cloudy joints, crooked panels, sticky fingers, and wondering whether acrylic secretly hates human beings.
You’re not alone.
Building a plastic cabinet using acrylic panels sounds straightforward until you discover a small detail that changes everything:
Not every glue likes acrylic.
Some adhesives create weak bonds.
Some leave ugly white marks.
Some release chemicals that are a terrible idea for clean-room environments.
And some behave like that friend who says, “Don’t worry, I know exactly what I’m doing,” right before things go spectacularly wrong.
If you’re constructing an acrylic cabinet for a clean room, choosing the correct adhesive is one of the most important decisions you’ll make.
In this guide, we’ll walk through:
✔ The best adhesives for acrylic panels
✔ Why ordinary glues often fail
✔ What works in clean-room environments
✔ Mistakes that ruin projects
✔ Product recommendations professionals trust
Let’s get started.
Quick Answer: What Is the Best Glue for Bonding Acrylic Panels in a Clean Room Cabinet?
If you’re in a hurry and want the short version:
The best adhesive for bonding acrylic panels in clean-room cabinets is usually an acrylic solvent cement (PMMA/MMA-based solvent weld adhesive).
Top choices include:
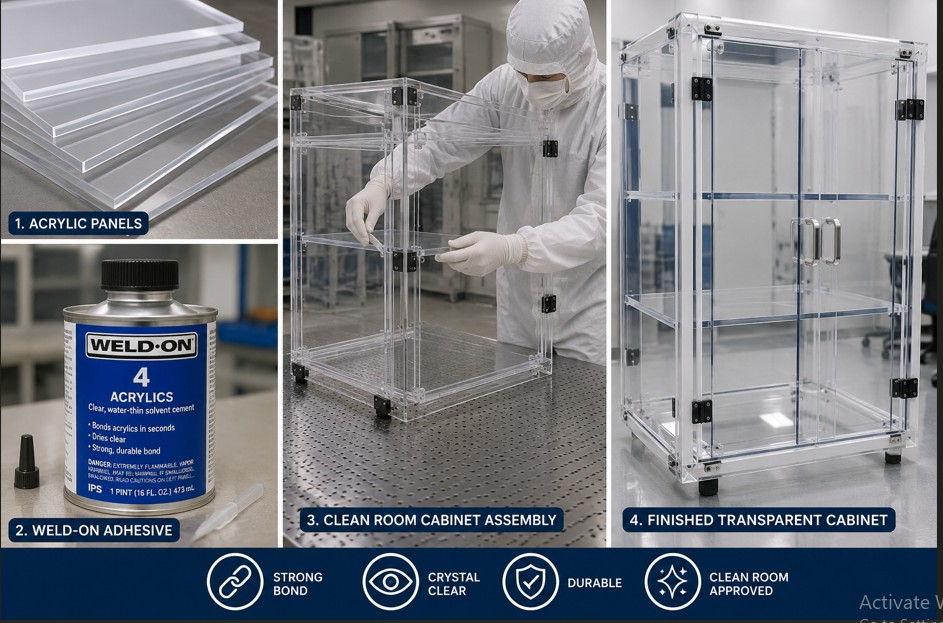
- Weld-On 4
- Weld-On 40
- SCIGRIP Acrylic Cement
- Two-part MMA structural adhesives
- Loctite Epoxy
These products don’t simply stick two surfaces together.
They chemically fuse acrylic pieces into a stronger, cleaner bond.
Think of it as less of a marriage and more of a molecular adoption process.
So… Why Is Gluing Acrylic So Complicated?
Acrylic looks harmless.
It’s clear.
It’s smooth.
It’s lightweight.
It sits quietly in the workshop pretending to be cooperative.
Then you start bonding it.
Suddenly:
- White marks appear
- Edges crack
- Seams separate
- Air bubbles show up
- Your stress level rises
The problem is that acrylic behaves differently from many other materials.
Wood can tolerate a lot.
Metal gives you options.
Acrylic can be picky.
And when clean-room requirements enter the picture, things become even more serious.
Now you need to think about:
- Strength
- Chemical emissions
- Dust generation
- Outgassing
- Surface cleanliness
- Long-term durability
A wrong adhesive might create contamination issues even if the bond itself looks strong.
Understanding Clean Room Requirements Before Choosing Glue
Before discussing products, let’s understand what makes clean rooms different.
A clean room isn’t simply a very clean room.
It’s an environment specifically designed to control contaminants such as:
- Dust particles
- Airborne chemicals
- Fibers
- Vapors
- Microorganisms
Even tiny contaminants can create problems.
Think of a clean room as a place where a dust particle suddenly becomes public enemy number one.
That means your adhesive needs to meet additional requirements.
Low Outgassing
Some adhesives release chemicals after curing.
This process is called outgassing.
Too much outgassing can contaminate sensitive environments.
Low VOC Levels
VOC means Volatile Organic Compounds.
High VOC products can release fumes and chemicals into the surrounding environment.
For clean-room use, low-VOC products are generally preferred.
Strong Long-Term Stability
You don’t want panels separating six months later.
Cabinets often support equipment, components, and repeated cleaning procedures.
The adhesive should remain stable over time.
Minimal Particle Generation
The last thing you want is a bond that slowly flakes or sheds particles.
Because in clean-room environments:
Tiny particles can become very large problems.
How Acrylic Actually Bonds (The Secret Most Beginners Miss)
Most people think glue works like this:
“Apply sticky liquid → press materials together → done.”
For many materials, that’s true.
For acrylic?
Not exactly.
There are two different approaches.
| Ordinary Adhesive | Solvent Cement |
|---|---|
| Sticks surfaces together | Fuses surfaces |
| Moderate strength | Very strong |
| Visible joints | Clear joints |
| Can peel over time | Permanent bonding |
| Higher contamination risk | Cleaner appearance |
Traditional adhesives create a layer between two materials.
Solvent cement behaves differently.
It slightly softens acrylic surfaces so they merge together.
After curing, the pieces become almost like a single continuous material.
It’s basically convincing two separate acrylic sheets:
“Congratulations, you were relatives all along.”
Best Adhesives for Bonding Acrylic Panels
Now let’s discuss the products that actually work.
Weld-On 4 — Best Overall for Acrylic Cabinets
For many acrylic fabricators, this is often the first recommendation.
Why?
Because it creates:
- Clear bonds
- Strong joints
- Fast curing
- Minimal residue
Pros
✔ Excellent optical clarity
✔ Fast setting time
✔ Strong structural bonds
✔ Professional-looking finish
✔ Low residue
Cons
✘ Requires tightly fitted joints
✘ Doesn’t fill large gaps
Best for:
- Acrylic cabinets
- Transparent display units
- Clean-looking seams
- Tight fitting acrylic panels
If your panels fit together properly, this is often one of the strongest choices available.
Weld-On 40 — Best for Heavy-Duty Applications
Sometimes projects need more than speed.
Sometimes you need strength.
This is where Weld-On 40 becomes useful.
Unlike thinner solvent cements, it’s a two-part reactive adhesive designed for demanding applications.
Pros
✔ Extremely strong bonds
✔ Suitable for larger projects
✔ Better gap filling
✔ High durability
Cons
✘ Longer working process
✘ Mixing required
Best for:
- Large cabinets
- Heavy panels
- Acrylic-to-wood applications
- Structural assemblies
SCIGRIP Acrylic Cement
SCIGRIP products are widely used for acrylic fabrication.
They offer reliable bonding while maintaining clean seams.
Pros
✔ Strong bonds
✔ Good clarity
✔ Multiple viscosity options
✔ Reliable performance
Cons
✘ Product selection may confuse beginners
Best for:
- Acrylic fabrication
- Plastic assemblies
- Cabinet projects
Two-Part MMA Structural Adhesives
These are excellent when your project has imperfections.
Because let’s be honest:
Not every DIY project produces laser-perfect panel alignment.
Sometimes there are gaps.
Sometimes cuts aren’t exactly perfect.
Two-part MMA adhesives help solve those issues.
Pros
✔ Gap filling capability
✔ Very strong bonds
✔ Fast curing
✔ High peel resistance
Cons
✘ Can cost more
✘ Strong odor during application
Best for:
- Uneven surfaces
- Larger gaps
- Heavy mechanical loads
Loctite Epoxy — Best for Certain Plastic Combinations
Epoxy products can work when bonding acrylic to certain plastics.
Pros
✔ Strong bonding
✔ Good versatility
✔ Useful for mixed materials
Cons
✘ Usually less clear than solvent cements
✘ Not always ideal for optical applications
Best for:
- Acrylic to plastic combinations
- Specialized applications
Products You Should Never Use on Acrylic
Some adhesives and acrylic get along like cats and swimming pools.
Avoid these mistakes:
Super Glue (Cyanoacrylate)
Problems:
- White haze
- Brittle joints
- Stress cracking
- Poor long-term durability
Generic Silicone Adhesives
Problems:
- Lower strength
- Weak structural support
- Poor long-term rigidity
Hot Glue
Problems:
- Temporary holding only
- Weak bond strength
Cheap Multi-Purpose Adhesives
Problems:
- Unpredictable results
- Poor durability
- Possible contamination concerns
Step-by-Step Guide: How to Bond Acrylic Panels Correctly (Without Creating a Plastic Puzzle)
Now comes the part where many projects either become professional-looking masterpieces or objects of regret sitting in a corner of the workshop.
The adhesive matters.
But how you apply it matters just as much.
Even the best adhesive in the world cannot save poorly prepared surfaces.
Think of it like making tea: great tea leaves won’t help much if somebody pours them into cold water and walks away.
Let’s go through the process.
Step 1: Clean the Acrylic Surfaces Properly
Acrylic surfaces collect all kinds of invisible troublemakers:
- Dust
- Finger oils
- Grease
- Tiny particles
- Residues from protective films
Before bonding:
Use:
✔ 99% isopropyl alcohol (IPA)
✔ Clean-room wipes
✔ Lint-free cloths
Avoid:
✘ Paper towels
✘ Dirty cloths
✘ Household cleaners containing ammonia
Household cleaners may damage acrylic over time.
And paper towels?
They love leaving tiny fibers everywhere.
Step 2: Dry Fit Everything First
Before opening the adhesive:
Place all panels together first.
Check:
- Alignment
- Corners
- Gaps
- Fit quality
This step saves frustration later.
Because once solvent cement starts working, it behaves like a countdown timer.
There isn’t much time for:
“Wait…this panel looks upside down.”
Step 3: Apply Adhesive Carefully
Application depends on the adhesive type.
For solvent cement:
Usually:
- Use applicator bottles
- Needle applicators
- Capillary application methods
Allow the liquid to flow naturally into joints.
Less is often more.
Adding too much adhesive doesn’t make the bond stronger.
It usually creates:
- Bubbles
- Smearing
- Surface marks
For two-part structural adhesives:
Mix according to manufacturer instructions.
Apply evenly along surfaces.
Avoid overfilling.
Step 4: Clamp Gently
Notice the word:
Gently
Not:
“Apply enough force to hold a truck together.”
Excess pressure can:
- Distort panels
- Squeeze out adhesive
- Create stress points
Light and even pressure is usually enough.
Step 5: Give It Time to Cure
This is where many people lose patience.
You look at the bond after 20 minutes and think:
“Looks solid enough.”
No.
Walk away.
Take a break.
Drink coffee.
Watch football.
Do almost anything else.
Typical curing periods:
Solvent cements
- Initial set: minutes
- Full cure: 24–72 hours
Two-part MMA adhesives
- Handling strength: minutes to hours
- Complete curing and off-gassing: longer
Always follow product recommendations.
Common Mistakes That Ruin Acrylic Projects
Most failed acrylic projects don’t happen because people used terrible products.
They happen because of small mistakes.
Let’s avoid them.
Using Too Much Adhesive
More adhesive ≠ stronger bonds.
Too much adhesive can create:
- Bubbles
- Cloudy seams
- Weak joints
Think precision.
Not flooding.
Rushing Cure Time
This one hurts because everything looks finished.
But incomplete curing can cause:
- Weak strength
- Contamination risks
- Joint failure
Patience usually wins.
Ignoring Surface Preparation
Dust and oils can destroy adhesion.
Even fingerprints matter.
Acrylic is surprisingly unforgiving.
Using the Wrong Glue
One of the most common examples:
“I had super glue already, so I used it.”
Then:
- White haze appears
- Cracks develop
- Seams fail
Your wallet usually remembers that decision.
Skipping Ventilation
Many adhesives release vapors during application.
Work in well-ventilated areas.
Ignoring Outgassing
This becomes especially important for clean-room applications.
Some products continue releasing chemicals after they feel “dry.”
The bond may feel cured while emissions continue.
Clean Room Safety Tips During Assembly
Building for clean-room use means thinking beyond simply joining plastic panels.
Wear Gloves
Gloves help reduce:
- Fingerprints
- Skin oils
- Contamination
Clean-room compatible gloves work best.
Use Lint-Free Materials
Avoid:
✘ Regular paper towels
✘ Old cloths
✔ Clean-room wipes
✔ Lint-free materials
Control Dust
Keep the work area clean.
Dust particles have a magical ability to appear at the worst possible moment.
Cure Outside the Clean Room
If possible:
Allow complete curing outside the final clean-room environment.
This reduces:
- VOC exposure
- Residual chemical release
- Particle contamination
Avoid Excess Mechanical Finishing
Heavy sanding or cutting after assembly can generate particles.
Try to minimize post-assembly work.
Best Adhesive Based on Your Situation
Not every project is identical.
Here’s a quick guide.
| Situation | Recommended Product |
|---|---|
| Tight acrylic joints | Weld-On 4 |
| Heavy cabinet panels | Weld-On 40 |
| Gap filling required | Two-part MMA adhesive |
| Acrylic to wood | Weld-On 40 |
| Acrylic to glass | Bostik Titan Bond Plus |
| Acrylic to ABS | Acri-Bond 120 |
| Mixed plastics | Loctite Epoxy |
Frequently Asked Questions
Can I use super glue on acrylic?
You can, but it usually isn’t recommended for structural acrylic applications.
Problems include:
- White residue
- Brittle joints
- Stress cracking
Can silicone bond acrylic?
Silicone can stick acrylic in some situations.
However, it generally provides weaker structural performance compared with acrylic solvent cements.
How long does acrylic cement take to cure?
Typical curing ranges from:
- Initial handling: several minutes
- Full cure: 24–72 hours
Actual times depend on:
- Temperature
- Humidity
- Adhesive type
- Thickness
Does acrylic adhesive release fumes?
Some products release vapors during curing.
Always follow ventilation recommendations.
Can acrylic bond to wood?
Yes.
Products such as Weld-On 40 can work for acrylic-to-wood applications.
Can acrylic bond to glass?
Yes.
Products like Bostik Titan Bond Plus may be used in certain situations.
Is epoxy stronger than solvent cement?
Not always.
For acrylic-to-acrylic joints:
Solvent cement often creates stronger and cleaner bonds because it chemically fuses materials together.
Which adhesive has the lowest contamination risk for clean rooms?
Low-VOC and low-outgassing acrylic-specific products are generally preferred.
Always review manufacturer specifications.
Recommended Products
Best Overall
Weld-On 4
Perfect for:
✔ Tight acrylic joints
✔ Professional appearance
✔ Transparent cabinet projects
Best Heavy-Duty Choice
Weld-On 40
Perfect for:
✔ Large cabinets
✔ Structural applications
✔ Heavy loads
Best Gap Filling Solution
Two-Part MMA Structural Adhesives
Perfect for:
✔ Uneven cuts
✔ Larger gaps
✔ High strength requirements
Best Budget-Friendly Option
SCIGRIP Acrylic Cement
Perfect for:
✔ General acrylic fabrication
✔ Smaller projects
Best for Mixed Materials
Loctite Epoxy
Perfect for:
✔ Acrylic-to-plastic applications
✔ Specialized bonding situations
Final Thoughts: Don’t Let the Wrong Glue Turn Your Cabinet Into Modern Art
Acrylic projects usually end in one of two ways.
Option one:
“Wow…that actually looks professionally made.”
Option two:
“Maybe I can hide this in the garage and pretend it never happened.”
The difference often comes down to one thing:
Choosing the right adhesive.
For most clean-room cabinet projects:
✅ Weld-On 4 is often the preferred choice for tight-fitting acrylic panels.
✅ Weld-On 40 works well for larger structural assemblies.
✅ Two-part MMA adhesives help when gap filling and additional strength are needed.
Take time preparing surfaces.
Keep contamination low.
Allow complete curing.
And resist the temptation to poke the bond every 30 seconds to “see if it’s ready.”
Your future self—and your acrylic cabinet—will appreciate it.
Good job